To view this content, you must be a member of Karen's Patreon at $1 or more
 Unlock with Patreon
Already a qualifying Patreon member? Refresh to access this content.
A knitting resource for left handed knitters
You came across a pattern that you just have to try so you jump in your vehicle, zoom down the road to your local craft store and buy the prettiest of yarn. Woo Hoo! You can’t wait to make this gorgeous project! That night you sit down on the couch, turn on Netflix, grab the yarn out of the plastic bag, But, wait! What do you do about starting a new skein?
Have no fear! The Left Handed Knitter is here!

A skein is a length of yarn that is ready for use. Typically big chain stores sell these types of yarn. They also tend to be lower quality yarns such as 100% acrylic.
A hank of yarn is a length of yarn wound into a large circle and then twisted on itself. It is not ready to be used. It must first be wound into a ball or skein. Hanks are typically sold at yarn stores or on line and they are of higher quality fibers such as alpaca or merino.
Knitting in a gorgeous color especially with fantastic wool is amazing! But there comes a time when you want to branch out and put many pretty colors into your work. Left handed fair isle to the rescue! Fair isle is a great way to break up the monotony and to give yourself some eye candy.
Fair isle is a way to knit a project in more than one color simultaneously versus knitting with multiple colors in stripes. The pros include: having a warmer garment since the unworked yarn in carried along in the back thus creating a double thickness and being able to knit pictures and patterns. The cons include: dealing with the floats, slower knitting time (at least for me), and weaving in tails.
Let’s start!

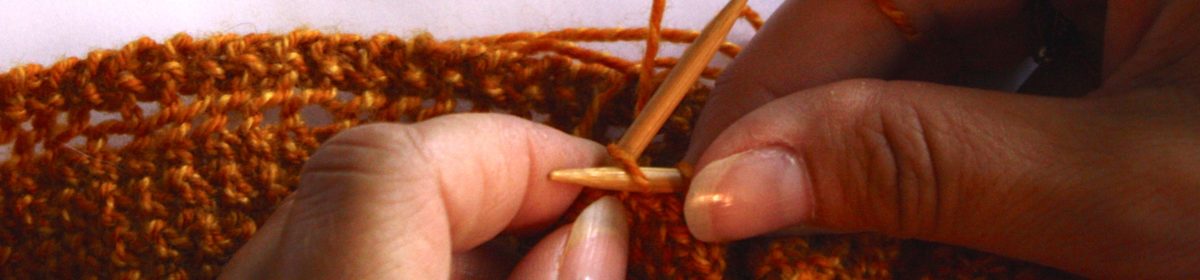
I hold my working yarns just like I do when knitting with only one color. The only difference is that I have one yarn above my knuckle and one below. There are fair isle knitting tools like this that you can find at your LYS: https://www.yarn.com/products/addi-knitting-thimble-finger-ring
I have tried them without success. I have man hands and those finger thimbles cut off the circulation to my finger because the thimbles are so small.


To knit hold both strands as demonstrated above. When it comes time to knit color one, in my example the red yarn, you just grab the working yarn with your needle and knit one. Knitting color two, in my example the white yarn, just grab that yarn. Remember to be consistent in holding your yarns in your right hand.

In the example above I needed to carry the while thread because I was knitting more than 4-5 stitches in red. I do not like to go more than that because the floats may catch or snag when in use. So, to carry the floats take the white yarn and put it over the red yarn. Then, take it under the red thread back to its original spot. Basically, you will be twisting the two threads. The red thread has now locked the white thread in place.


Yay! Color one is completed with the unworked yarn twisted in the back. Time to start color two. If you begin knitting with color two without any extra attention your work will begin to pucker and gather.
Look at any of these photos of my hat. In the photos you will see a lot of gathering or puckering of my work. When I started this project I was early in my knitting career and didn’t have a firm understanding of how to knit without the puckers. My work looks wonky because my floats are too tight which causes the garment to pull in on itself. This is not good. It doesn’t look professional and it can affect the overall fit of a garment. I have a pair of fair isle socks that are very tight to put on because I didn’t adequately carry my floats. Needless to say, I don’t wear those socks very often!
The above photo shows my own method of making sure my floats are loose. As I am knitting I stick my fingernail in the way and knit over it which causes more yarn to be used to make that stitch. It’s a bit awkward, but it works for me.

Next, I take the stitches that color two floated behind and I pull them apart to maximum stretch. I can pull up any extra slack if my fingernail method used too much yarn. My garment will now stretch to it’s maximum when worn.
I made a short video for you if you need to see this in action.
I LOVE charts because almost without fail I can read them left to right and knit happily away! Same is true for fair isle work. Go ahead and read your work from left to right. Your picture/motif will look exactly the same.
The way we learn how to do a skill tends to be our preferred method. I learned how to knit using the eastern uncrossed method and hence, this website is dedicated to knitting this way. Most lefties, however, learn how to knit using the left handed western mount knitting. Another lefty on Ravelry chastised me when I presented this website to the community as a resource. She felt I would only confuse people since I only presented my way of knitting. Because of this she did not think I should advertise and promote my website as a resource.
I have more faith in my fellow lefties and their smartness than she does. If someone comes to this website and sees it isn’t the way they knit then they will move on and find another website that suits their needs. I have had enough inquiries about different aspects of left handed knitting to know that my website is a useful website. In addition, I have successfully assisted lefties who knit using the western mount.
Today’s post then is first, my acknowledgement that two ways to produce the knit stitch exist. Second, that I knit the more unorthodox way and third , this website is geared towards the way I knit.
So, What is the difference?
Two differences exist: which leg is the leading leg and the way the yarn wraps around the needle. The next question, then, “Which one should I use?” This is purely a matter of preference. Both styles will produce the same result in the end.
In eastern uncrossed (the way I knit) the leading leg is in the back of the needle and you wrap the yarn clockwise as if the needle is pointing right at your face.
In western knitting the leading leg is in the front and you wrap your yarn counter clockwise.

You can see in this photo that I am about to start the next stitch. I am going to insert my left needle from the right side of the stitch.

Here my needle is in the stitch and I am ready to wrap.

Wrapping the yarn counter clockwise. Then finish the stitch.
That’s all. You have now knitted using western mount. This mimics how right handed knitter make the knit stitch.

Here is the purl stitch. Purl into the leg closest to you and wrap your yarn clockwise.
To recap:
Style Leading leg Direction of wrap
eastern In the back Clockwise
western. In the front Counter cw
Here’s a short video showing left handed western knitting. Left handed Western Knitting
I hope this helps you have a better understanding of knitting and knowing that there is no right or wrong method to knitting.

Short rows confounded me for years. I found the process very daunting and avoided any pattern that used short rows. I couldn’t find a good tutorial to help me demystify this very easy process. Hopefully, you will find left handed short rows easy and straight forward with this picture tutorial.
So what are left handed short rows? Short rows are a process of adding a pocket or wedge of fabric to your piece without adding length. On the first two rows you knit to two stitches before the end of the row and then complete the left handed short row. On all subsequent rows you knit to the stitch before the previous short row thus each row becomes shorter and shorter. When all short rows are completed then you knit across picking up all of the wraps and knitting them with the stitch they were wrapped around.


