
Today let’s look at the very simple and very easy, left handed knit front and back (kfb). It is an increase that is great for beginner knitters as it does not have directionality like the M1L and the M1R. Another difference is that the kfb is made in a stitch where as the M1L and the M1R are made between stitches. This is an important concept to know if you are substituting one increase for another in a pattern (I confess, I do that a lot). I will explain further at the end of this post.
First, let’s look at when it is a good time to use the left handed knit front and back (kfb). I typically do not use this increase unless I am working on a project that is inconsequential or where the increase is not part of the overall look of the finished fabric. In addition, I will use it in a garter stitch pattern or in a ribbing pattern. The increase blends into the fabric and does not stand out. The kfb creates a purl bump so that is why it is good for garter stitch or ribbing.
Now, let’s go over how to form the kfb.
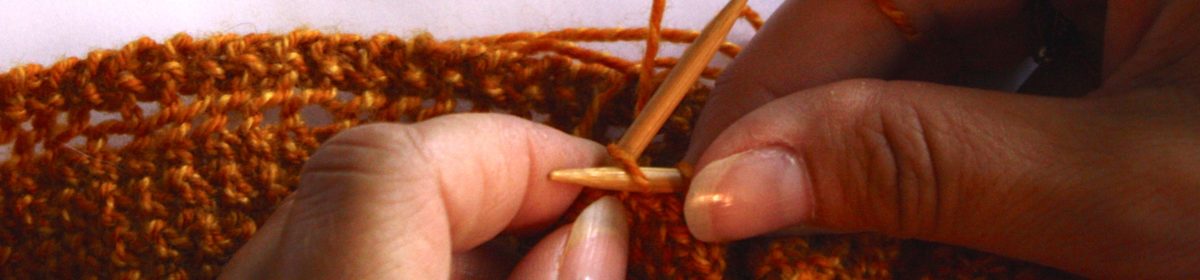
The Left Handed Knit Front and Back (kfb)

Pictured above: the stitch that will become a kfb.

As the name implies, kfb, you will knit into the next stitch as usual but do not drop the new stitch off the needle.

Next, you will knit into the back loop, which is the leg of the stitch closest to you. As you recall from previous posts this means entering the stitch from right to left.

Finally, complete the stitch as usual.

In the above photo you can see the increase as two stitches.

Here you can see the purl bump.

 Here, in the above photo you can see the difference between the M1L/M1R and the knit front and back (kfb).

A closer look at the kfb with my finger pushing it out so you can see it better.
At the beginning of this post I mentioned that you need to be careful when swapping increases when reading a pattern. The reason is that your stitch count within that row will be off by one. You might read in a pattern, “knit to the last three stitches, kfb, k2”. Substituting a M1 increase, would then be, “knit to the last three stitches, M1R, k3”. This is because you are not using one of those three stitches to make the increase. I hope that make sense!
One other thing to keep in mind. If you use the left handed knit front and back (kfb) in ribbing, for example, you will need to make the increase after the knit stitch. Otherwise, the purl bump of the kfb will be in the wrong location.
I hope you have enjoyed this post! Please leave some comments below and tell me what you think.
As always, if you have an idea for a future post, please either email me or leave a comment below.
I wonder if you could explain how to increase pfb.
Oh boy. I was going to leave a comment and I still probably will, but your script for this leaves a lot to be desired. When one had to go back to fill in the email address, for example (I hit return and I guess I shouldn’t have – the page used the enter as posting the comment), the name was gone, so I retyped that and submitted. Ooops… my comment was going too. *sigh*
Anyway… I really did want to thank you for posting this. I could follow it easily and that is such a help! At times being a lefty can be challenging! 🙂 I’ve managed cables with right-handed illustrations, but no one seems to think of doing something simple… like how to do the basics. I followed a link to come here… wasn’t even searching. But you can bet that when I get home I WILL do a search to find your page. I’m a lefty continental knitter. I think it’s because I crocheted for years and years before I knitted, which I taught myself…. so it’s nice to see that others’ hand positions, etc., look like mine. LOL Thanks again!